A multisite network is a collection of websites that all share the same WordPress installation.” These websites in a network can also share plugins and themes. The individual websites in the network are virtual websites because they do not have their own directories on your hosting server, although they do have separate directories for media uploads within the shared installation, and they do have separate tables in the database too.
WordPress 3.x version have a important feature to create a network of websites by using its multi-site feature. Here We will have all instructions for creating a multisite network for your WordPress blog. You can create a multisite network in which administrator can add new websites.A multisite network can be very similar to your own personal version of WordPress.com.
Step 1: Make sure that Pretty Permalinks are enabled on your website. Also deactivate all your active plugins, you can reactivate them again after the network is created.
Step 2: Open wp-config.php file from root of your installation and add the below line above where it says /* That’s all, stop editing! Happy blogging. */.
<code>
/* Multisite */
define( ‘WP_ALLOW_MULTISITE’, true );
</code>
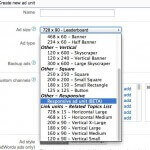
Step 3: Now refresh your dashboard and go to “Network Setup” item in your “Tools” menu.You need to chooose between sub-domains and sub-directories.You must choose one or the other. You can reconfigure your network to use the other choice after installation.
These are filled in automatically, but you can make changes.
Server Address:The domain of the URL you are using to access your WordPress installation.
Network Title:The title of your network as a whole.
Admin E-mail Address:Your email address as super admin of the network.
Then click the Install button.
Step 4:
There are two steps to follow:
1. Add the given lines to your wp-config.php file at the end.
2. Add the given lines to your .htaccess file
After completing these steps, log in again. You might have to clear your browser’s cache and cookies in order to log in.
Step 5:
In your WordPress toolbar a new item “My Sites” will appear. There, all your sites are listed, with handy fly-out menus, as well as a Network Admin menu item. Under Network Admin you can use the Dashboard item to go to the Network Dashboard page.
Go to the Settings Screen to configure network options, and the Sites Screen to manage your sites.
There are many more additional things you might need to know about advanced administration of the network, due to the additional complexity of a Multisite. Even if you’re familiar with WordPress, the location and behavior of Multisite Network Administration can be confusing.
Read Multisite Network Administration for more information.